There are a number of photography groups on Facebook that I participate in and one of my new favourites is Bermuda Art Unlimited (https://www.facebook.com/groups/2210893659027826/?multi_permalinks=2253971418053383%2C2253813988069126%2C2253797191404139%2C2253809871402871¬if_id=1562661983132099¬if_t=group_activity) . This is a newly created page with a focus on photography and photography projects for Bermudians.
Each week there is a challenge posted and this week (8th July, 2019) is Black & White Intentional Motion Photography #BWIMP. I submitted the below image and was asked how it was created and whether Ii would be willing to disclose my process to creating it. Always happy to talk photography and now that I am teaching photography it is even more fun to talk about it and methods to achieve different looks.
To create and image like this, very easy for those of us who know our way around a camera and how to achieve proper exposure, is to understand the Exposure Triangle. This is a topic I have posted about previously and will give an overview here. I will also drop a diagram of the Exposure Triangle below.
Very simply the Exposure Triangle is made up of the the three key elements of proper exposure, Shutter Speed, Aperture and ISO. Essentially each of these works inversely to each other, that is, the faster your Shutter Speed the larger your Aperture needs to be and the higher your ISO needs to be……….Kind of…….
Let me explain further, most students that take our classes have never shot in Manual Mode because they have a hard time understanding Shutter Speed to Aperture to ISO. Our first goal is to get them to gain an understanding of the Exposure Triangle and then getting them to apply what we have taught through application. So, here is how I teach it:
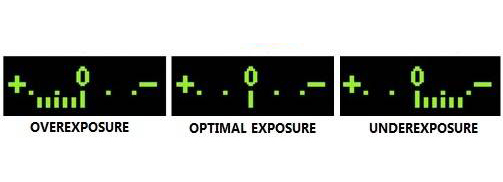
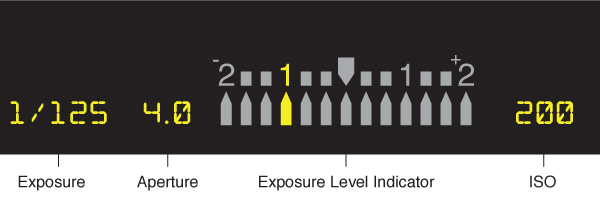
Yes, there are three variables to the Exposure Triangle but you can make some decisions before hand that make gaining proper exposure easier. First, if we are out in sunlight you can preset your ISO, my recommendation is anything from ISO 100 to ISO 400, now that you have set that determine when you want shallow depth of focus or broad depth of focus, that is do, you want to blur the background (large aperture…….f1.4, f1.8, f2, f3.5, f4.6, f5.6), once this is done the only variable remaining is your shutter speed. So once you have set the ISO and Aperture you simply look through the viewfinder while framing your subject and zero out the meter in your camera (see examples of meters seen through the view finder below), note the one that says “Properly Exposed at Zero,this is what we are trying to achieve. So once you have set the ISO and Aperture you need only adjust your Shutter Speed faster, e.g. 1/200th, or slower, e.g. 1/50th to more the needle to Zero.
Another example is you preset your ISO as above, but now you want to control when the image will exhibit some blur (motion), so you set a slow Shutter Speed, maybe around 1/15th. Now to zero out your meter you will need to adjust your Aperture one way or the other.
Finally, if you are shooting in lower light conditions you will need to first set your Shutter Speed and Aperture and use the ISO to zero out your meter. For example, you are in a park just after Sun set, there will be very little ambient light from the Sun but you want to freeze the movement of, say your dog, You will first set a relatively fast Shutter Speed (1/500th - 1/1000th) then because you want to blur the background you know you will need a larger Aperture, say f5.6 (most consumer lens will offer this as one of the larger Apertures). Once you have done this and you look through the view finder you realise that the meter is showing under-exposure, that is the camera is telling you the image will be dark. To counter this you will need to adjust your ISO, you know from above that in brighter light you will use an ISO of 200 or 400, so you know that you need to now increase your ISO to say, 1000. Now your meter tells you the image will be properly exposed. You take the shot and get confirmation.
Essentially, the ISO setting determines how sensitive the camera sensor (or with analog photography, the film) is to light. I will not discuss it here but the higher your ISO the more noise or grain will appear in your image. This is for another discussion.
So, now you have an idea of how to set your camera exposure manually.
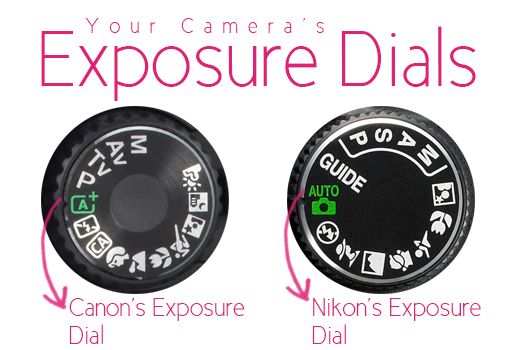
With all that being said, virtually all digital cameras will have exposure dials that look like the below. Canon and Nikon are shown in the image but this will be fairly consistent across brands. We want to focus on Tv for Canon and S for Nikon.
These symbols represent Shutter Priority, in other words you are telling the camera you want to control the Shutter Speed but it it to control the Aperture, remember, you have pre-determined the ISO you will use or you can set ISO to Auto and let the camera decide. I am a proponent of manually selecting the ISO to avoid ti going too high, see my comment about noise above.
Ok, so we have selected Shutter Priority, now to create an image of a car speeding through the scene you will first need to select a slow Shutter Speed, don’t go too slow at first or you will get frustrated at the results. I suggest starting with a minimum Shutter Speed of 1/50th, make sure your focus point is in the centre of the view finder, to confirm this look through the view finder and half press the shutter button as you would to achieve auto focus, there will be a red square, that is the focus point, if it is not in the centre, use the toggle arrows to move it there (I have to assume you know how to move your focus point).
Now that we have the camera in Shutter Priority, have set our Shutter Speed to 1/50th and we have we have the focus point in the middle of the viewfinder, the next step is to set the camera to capture its faster frames per second (fps), again I have to assume to know how to set this option. Now before we start to shoot, the last step is to set the camera to continuous focus mode, you will no longer hear a beep when you achieve focus, whenever you half press the shutter button and move the camera the camera will be continually trying to find focus.
Ok, so we have all of this set up and we are ready to go. Once you see a car arriving point the camera at the car, make sure the focus point is on the car, press the shutter button, holding it down continuously, now follow the car with the camera, as if you are tracking it (which is what you are doing), continue to do this until the car has gone past you then release the shutter button. You will now have a series of images of the car, some may be out of focus but you are likely to have some in very good focus. You have just completed the photography skill/technique called Panning. This can be done with any moving subject, a car, a runner, an animal, a person. To create a more dramatic sense of movement practice with very slow shutter speeds, your keep rate will drop but the photos will become more dramatic.
Why does this happen? Because you have used a slow shutter speed any movement of the camera will create blur, this blur will not be seen in the car because you are moving (or trying to move) the camera at the same speed as the car, s to the camera the car is still. So go out and try it.
Most people, when shooting vehicles will use a fast shutter speed to freeze the vehicle but the reality is you can just take a picture of a parked car and get the same result. With a correct panning technique the slow shutter speed will blur the wheels of the car because the wheels are turning at a faster pace than the car is moving. This also gives the feel of movement.
Hopefully this has been helpful, feel free to leave any comments or feedback below.


