Why Digital Photogs Should Shoot Film

This is not a post about Digital vs Film, it is not a post to claim one is better than the other, the intent of this post is to illicit a thought.

Reasons why every digital photog should shoot film, at least for a period of time. These are in no particular order

1) Shooting film slows your shooting process down. Unlike digital, where you can shoot and shoot and worry about processing later to correct errors and straighten images, etc., with film you have a limited number of frames per roll (24 or 36 in 35mm and between 10 and 15 for medium format, 120 film), this limited number of frames forces you to properly compose and meter. With film, every frame you expose comes at an expense, once the frame is exposed it cannot be deleted and it has to go through the development process. The need to be more meticulous, so as not to waste any frames, affords for the “training” of your photographer’s eye, this means you will improve your compositional and metering skills……making you a better photographer at the end of the day.

2) Shooting film requires patience. Unlike digital, when you expose a frame on film you cannot review the image on the back of the camera, you have to wait to process the film, if you process yourself, or wait for the developed film to be returned to you from the lab. This means you have to patiently wait before you can review what you have shot…….this make the above reason, proper composition and metering, more important because you may be unable to re-shoot the images.

3) Image quality. The use of film generally affords you a broader dynamic range. Films like Kodak Portra, for example, will allow you too over expose up to 5 or 6 stops and still retain the highlight details. Every the best and most expensive digital cameras will not afford you such leeway. Yes, some film stocks will produce grainy images but you can also control the grain through exposure and development. The below image of the straw bags was shot on Kodak TMax 400, a low grain B&W film, as you can see grain is nearly non-existent. However, grain in film is different from noise in digital, the grain, by many, including myself, view grain as part of the beauty of film photography…….ask yourself why there are so many digital editing presets looking to replicate film grain.

4) The here and now. How many times have you been shooting a subject and after even capture, or every few captures, do you stop to review the image(s)? This takes you out of the being present with your subject, it is a disconnect. This is important because if you are shooting a model the best images result from developing a photographic connection with the model, each time you stop to look at your screen you create a disconnect and depending how long you take to review and make adjustments the more time your model is waiting for you. Stopping to review could also result in missed photo opportunities. With film you don’t have this issue because you have nothing to review.

Again, this is not about one being better or worse but it is intended to help you to understand how shooting film, even casually, can improve your digital photography work and your workflow.

Happy, as always, to discuss this and any other photography subject.

Scan487 - Edited - SML.jpg

Shooting Film vs Shooting Digital

On the surface, the immediate difference between shooting film and shooting digital is that with digital you get instantaneous feedback on the image you have captured by looking at the review screen on the back of the camera. With film you really do not know what you have until the developed film comes out of the development tank, dries and you scan it. Although, once you truly understand the exposure triangle and are comfortable with it you actually do know what you have captured.

Beyond the ability to review or not review the basic difference between shooting film vs digital is how images are exposed.

With digital it is important to expose for the highlights because if the highlights are blown out there is no detail in those areas to work with, if you have the Highlights feature of your camera turned on you will see blinking in the over exposed areas, further, if you understand the histogram, an image that has over exposed highlights will have a histogram that has a high peak on the left hand side.

Since film has a greater dynamic range, the latitude between highlights and shadows while retain detail in both, than digital and because film needs more light than digital the phrase, “expose for the shadows and develop for the highlights” is often espoused, that is really more applicable to sheet film than it is to roll film because you can exposure and develop each sheet differently. With roll film you drop the film in the development tank and the entire roll receives the same developing process. My advice when shooting film is to err on the side of over exposure because film needs light and it very easily retains highlight details when over exposed. Under exposure in film causes muddied and unflattering shadow detail.

The other important difference between shooting film vs digital is that with film you are essentially stuck with the ISO you have selected for the film that is in the camera, you either shoot at the box speed ISO of the film, or you push the film (rate and expose the film at an ISO speed faster than the box ISO, for example, you rate an ISO 400 speed film at ISO 800, thus under-exposing the film) or you pull the film (rate and expose the film at an ISO speed slower than the box ISO, for example, you rate an ISO 400 speed film at ISO 200, thus over-exposing the film). When you push or pull the film you compensate for the difference in your development time. Will digital you can shoot every single frame at a different ISO because each frame is a completely separate digital file.

As a side note, there is a film development process that will allow the photographer to develop roll film where the ISO rating has been varied within the roll……..Stand Development. I will write about my experiences with Stand Development in another blog post.

Beyond these differences between shooting film vs digital it is still photography and the rules of exposure and composition remain across the formats. I encourage everyone to pick up a camera and record the World around it as seem only through your eyes.


Panning Photography

There are a number of photography groups on Facebook that I participate in and one of my new favourites is Bermuda Art Unlimited (https://www.facebook.com/groups/2210893659027826/?multi_permalinks=2253971418053383%2C2253813988069126%2C2253797191404139%2C2253809871402871&notif_id=1562661983132099&notif_t=group_activity) . This is a newly created page with a focus on photography and photography projects for Bermudians.

Each week there is a challenge posted and this week (8th July, 2019) is Black & White Intentional Motion Photography #BWIMP. I submitted the below image and was asked how it was created and whether Ii would be willing to disclose my process to creating it. Always happy to talk photography and now that I am teaching photography it is even more fun to talk about it and methods to achieve different looks.

To create and image like this, very easy for those of us who know our way around a camera and how to achieve proper exposure, is to understand the Exposure Triangle. This is a topic I have posted about previously and will give an overview here. I will also drop a diagram of the Exposure Triangle below.

Very simply the Exposure Triangle is made up of the the three key elements of proper exposure, Shutter Speed, Aperture and ISO. Essentially each of these works inversely to each other, that is, the faster your Shutter Speed the larger your Aperture needs to be and the higher your ISO needs to be……….Kind of…….

Let me explain further, most students that take our classes have never shot in Manual Mode because they have a hard time understanding Shutter Speed to Aperture to ISO. Our first goal is to get them to gain an understanding of the Exposure Triangle and then getting them to apply what we have taught through application. So, here is how I teach it:

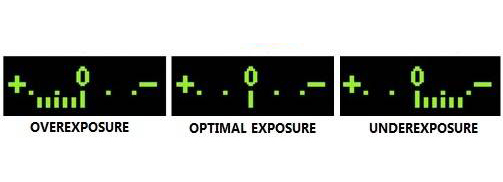
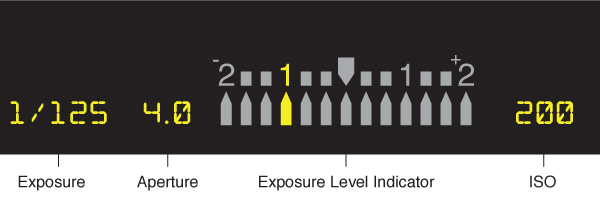
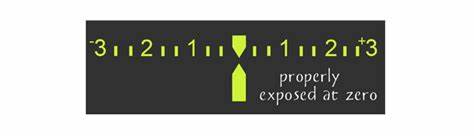
Yes, there are three variables to the Exposure Triangle but you can make some decisions before hand that make gaining proper exposure easier. First, if we are out in sunlight you can preset your ISO, my recommendation is anything from ISO 100 to ISO 400, now that you have set that determine when you want shallow depth of focus or broad depth of focus, that is do, you want to blur the background (large aperture…….f1.4, f1.8, f2, f3.5, f4.6, f5.6), once this is done the only variable remaining is your shutter speed. So once you have set the ISO and Aperture you simply look through the viewfinder while framing your subject and zero out the meter in your camera (see examples of meters seen through the view finder below), note the one that says “Properly Exposed at Zero,this is what we are trying to achieve. So once you have set the ISO and Aperture you need only adjust your Shutter Speed faster, e.g. 1/200th, or slower, e.g. 1/50th to more the needle to Zero.

Another example is you preset your ISO as above, but now you want to control when the image will exhibit some blur (motion), so you set a slow Shutter Speed, maybe around 1/15th. Now to zero out your meter you will need to adjust your Aperture one way or the other.

Finally, if you are shooting in lower light conditions you will need to first set your Shutter Speed and Aperture and use the ISO to zero out your meter. For example, you are in a park just after Sun set, there will be very little ambient light from the Sun but you want to freeze the movement of, say your dog, You will first set a relatively fast Shutter Speed (1/500th - 1/1000th) then because you want to blur the background you know you will need a larger Aperture, say f5.6 (most consumer lens will offer this as one of the larger Apertures). Once you have done this and you look through the view finder you realise that the meter is showing under-exposure, that is the camera is telling you the image will be dark. To counter this you will need to adjust your ISO, you know from above that in brighter light you will use an ISO of 200 or 400, so you know that you need to now increase your ISO to say, 1000. Now your meter tells you the image will be properly exposed. You take the shot and get confirmation.

Essentially, the ISO setting determines how sensitive the camera sensor (or with analog photography, the film) is to light. I will not discuss it here but the higher your ISO the more noise or grain will appear in your image. This is for another discussion.

So, now you have an idea of how to set your camera exposure manually.

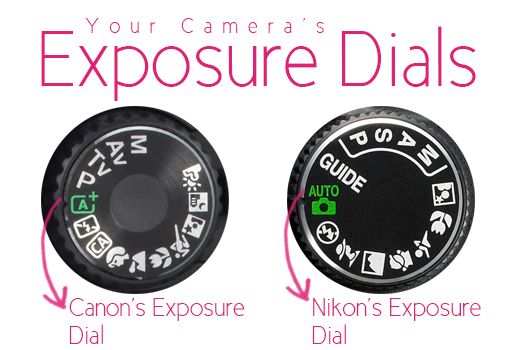
With all that being said, virtually all digital cameras will have exposure dials that look like the below. Canon and Nikon are shown in the image but this will be fairly consistent across brands. We want to focus on Tv for Canon and S for Nikon.

These symbols represent Shutter Priority, in other words you are telling the camera you want to control the Shutter Speed but it it to control the Aperture, remember, you have pre-determined the ISO you will use or you can set ISO to Auto and let the camera decide. I am a proponent of manually selecting the ISO to avoid ti going too high, see my comment about noise above.

Ok, so we have selected Shutter Priority, now to create an image of a car speeding through the scene you will first need to select a slow Shutter Speed, don’t go too slow at first or you will get frustrated at the results. I suggest starting with a minimum Shutter Speed of 1/50th, make sure your focus point is in the centre of the view finder, to confirm this look through the view finder and half press the shutter button as you would to achieve auto focus, there will be a red square, that is the focus point, if it is not in the centre, use the toggle arrows to move it there (I have to assume you know how to move your focus point).

Now that we have the camera in Shutter Priority, have set our Shutter Speed to 1/50th and we have we have the focus point in the middle of the viewfinder, the next step is to set the camera to capture its faster frames per second (fps), again I have to assume to know how to set this option. Now before we start to shoot, the last step is to set the camera to continuous focus mode, you will no longer hear a beep when you achieve focus, whenever you half press the shutter button and move the camera the camera will be continually trying to find focus.

Ok, so we have all of this set up and we are ready to go. Once you see a car arriving point the camera at the car, make sure the focus point is on the car, press the shutter button, holding it down continuously, now follow the car with the camera, as if you are tracking it (which is what you are doing), continue to do this until the car has gone past you then release the shutter button. You will now have a series of images of the car, some may be out of focus but you are likely to have some in very good focus. You have just completed the photography skill/technique called Panning. This can be done with any moving subject, a car, a runner, an animal, a person. To create a more dramatic sense of movement practice with very slow shutter speeds, your keep rate will drop but the photos will become more dramatic.

Why does this happen? Because you have used a slow shutter speed any movement of the camera will create blur, this blur will not be seen in the car because you are moving (or trying to move) the camera at the same speed as the car, s to the camera the car is still. So go out and try it.

Most people, when shooting vehicles will use a fast shutter speed to freeze the vehicle but the reality is you can just take a picture of a parked car and get the same result. With a correct panning technique the slow shutter speed will blur the wheels of the car because the wheels are turning at a faster pace than the car is moving. This also gives the feel of movement.

Hopefully this has been helpful, feel free to leave any comments or feedback below.

Mini in Motion.jpg
Exposure-Triangle.png

What Constitutes a Strong Image - My View

So, what do I BELIEVE are the components that make a good or great image?

This will be relatively short as I see this as an introduction of this topic, from my perspective.

1) First and foremost the viewer of the image should not have to guess what the subject of the image is. The eye of the viewer should go straight to the subject or be led, uninterrupted to the subject, very quickly.

2) The image should provide “balance” for the eye. To me this means that the composition of the image should feel natural to the eye, unless the goal is abstract.

3) There should be contrast between the subject and the other elements of the image. This does not mean that it needs to be a high contrast image but there should be a difference colour, lighting, toning, etc. between the subject and the other elements of the image so the subject stands out. This is very similar to No. 1.

4) The use of Lead In (Leading) Lines. This is when there is a distinct “line” within the image that leads the viewer’s eye through the image to a specific element in the image. The most obvious one would be using railroad tracks leading to a train, there is no doubt where the tracks are leading. This creates intrigue andn the eye wants to follow these lines to “see” where they lead.

How to meet these components:

  • Use of aperture to “isolate” the subject. A larger aperture will have the subject in focus with other, less important elements, out of focus……..this is Bokeh

  • Use of the Rule of Thirds. Divide the focus screen, either mentally or by turning on the grid within the viewfinder, and place the subject within one of the thirds. Many will say the subject should not be placed directly in the middle third, but there are occasions where it is effective to place the subject in the middle, for example, when capturing a portrait in portrait orientation most of the subject will likely be in the middle but the characteristics, the eyes, may be “off-centre”. For landscape images where there is a clear horizon I would say determine which area of the scene shall carry the most weight, the sky or the ground. This determination can made based on where the most interesting elements are. For example, if you are wanting to portray dark storm clouds then it would be appropriate to give the clouds the most weight. If you are wanting to show the lights of a city you will minimise the sky.

  • With regard to contrast, make certain your subject does not blend into the background by being the same colour thus “getting lost” in the background.

  • Use something within the image that will causes the viewer’s eyes to be directed through the frame to a specific location of element.

I have added a few images of mine that I believe are strong images and meet the parameters mentioned.

In the first image of the swimmer, I have placed him (key element is his goggles/eyes) in the upper left third and have left enough negative space, camera right, to allow for him to swim into.

In the second image I have used the Rule of Thirds in two ways, clearly the sky has more interesting elements than the water so I have given the sky more prominance. The use of the Coconut Tree, right third, has given a place of reference and works with the water to say, “Welcome to the Tropics, come on in”

In the third image the subject is very, very clear, it is the observation tower and the horizon leads the eye to the subject. I have also used the Rule of Thirds again and there is “contrast” between the subject and the background.

In the fourth images, again I have used the Rule of Thirds but more pronounced is the use of the rocks as a Lead In Line. The rocks start in the lower left third and lead the eye into and through the image to the sailboat, giving the feel of this is where you go to unwind and relax.

The final image is essentially a portrait of a Flamingo and while the bird is relatively centered its head sits in the upper left third creating balance in the image. I have used a large Aperture, the smaller the number, the larger the Aperture and greater the background will be out of focus. Note that the key focus is on the eyes of the Flaming, that is because whenever you take a photo of something with eyes, a person or an animal the eyes must be the focal point.

_GGS9290-1 -  SML.jpg
DSC_3153.jpg
_GMG6811 - Optional.jpg
_GGL4777 - Email.jpg
_GMG7812 - Less Sat.jpg

Is the Zone System Applicable to Digital?

As most who know me know that much of my photography these days revolves around shooting film, principally using a Pentax 6x7 Medium Format camera and those with whom I have spoken with about this will note that I use the Zone System, a photographic technique for determining optimal film exposure and development, formulated by Ansel Adams and Fred Archer.

The Zone System assigns numbers from 0 through 10 to different brightness values, with 0 representing black, 5 middle gray, and 10 pure white; these values are known as zones. 

Yesterday, my teaching partner, Rashad Penn (www.rashadpennphotography.com) and I taught an advanced photography class and during this class we presented the Zone System to the students. These students obviously shoot digital and with the help of http://www.myphotocentral.com/articles/zone-system-for-digital-exposures/#respond we presented the images at the bottom of this post to show that the Zone System is indeed applicable to digital and we were able to show the students how to apply the Zone System to their shooting process.

As can be seen in the image only Zone III through Zone VII are applicable to the vast majority of digital camera sensors as the dynamic range of these sensors is from -2EV to +2EV, anything outside these ranges will result is no data being available within the image.

One thing newer photogs should understand is that unlike film that requires a lot of light to gain proper exposure digital actually requires less light, in fact, it is better to under-expose in digital photography and to bring shadow detail out in post processing. Film has a higher dynamic range than does digital.

When shooting film, I meter for the shadows, determine which Zone I want the shadows to be in for the final image but for digital I meter for the highlights. There will be occasion, with digital, that the dynamic range of the scene will fall outside the capability of the sensor. At those times, depending on what I want to use the image for, Ii will either severely under-exposed to retain highlights, knowing that some of the shadow detail will not be retrievable, I will look for a composition to exclude much of the highlights or I will forgo the capture altogether if I can return to the scene under better lighting conditions.

So, how do I recommend using the Zone System in digital? I suggest finding a midtone, within the scene and which will be included in your composition, meter off this midtone and zero out the meter in your camera. Once you have done this increase your shutter speed so that the marking on the meter in your camera is one bar to the left, this should be 1/3rd to a 1/2 stop under-exposed, capture the image and this should result in a very slightly under-exposed image that can be adjusted in post processing. The reality is, unless the difference between your highlights and shadows falls within -2EV and +2EV, highly unlikely in bright sunny conditions, when most of those who use their cameras for capturing family moments are likely to shoot, you cannot get it completely right in camera but you are better off, with digital, to under-expose than you are to over-expose.

I don’t have a Gray Card so how do I find a midtone?

To find a midtone within the scene look for reds or greens or even whites in full shadow. Barring that……I bet most are completely unaware of this…………..open your camera bag and in the majority of cases what you will find is that the inside liner and dividers of your camera bag are………..very close to, if not, 18% gray. Pull out one of the dividers, place it in the same light as your subject and meter off this. If the dividers are not removable place your camera bag in the scene, lift the top flap of the bag and meter off the inside.

This has been a very broad overview of the use of the Zone System in digital photography.

There is a vast amount of information online about the Zone System but a couple of pages I think you will find helpful, including the one I provided a link for above are:

http://www.myphotocentral.com/articles/zone-system-for-digital-exposures/#respond

https://luminous-landscape.com/zone-system/

https://photography.tutsplus.com/tutorials/understanding-using-ansel-adams-zone-system--photo-5607

I hope this article has be helpful and insightful for you and I welcome your feedback. Leave me a comment in the Comments section. Also include any topics you would to see me cover.

Thank you for your time and attention.


Zone System - Adapted for Digital.jpg
Zone System Graphically.jpg

Why I decided to Teach Photography

For nearly as long as I have known myself I have had a fascination with pictures.

As I got older this fascination grew and became a passion. When I first learned photography, most professional photographers were unwilling to teach someone who could potentially become their competitor, so pretty much learned on my own, through trial and error and experimentation. After “practicing” this wonderful art form for nearly 40 years I have garnered a whole lot of knowledge and what good is knowledge if you don’t share it?

I never viewed photography as overly difficult but there are some technical aspects that one must learn in order to capture the beginnings of a quality image.

While each element of photography works in unison to create a great image when first learning photography there are steps one can take to begin to create good images. The first, in my view, after learning how to properly hold/stabilise the camera, is Composition. An image with good composition can be an effective image even if the exposure is marginally off.

Second is proper exposure. After Composition, Exposure, in my view, is the basis of good photography. So while an image with good Composition with Exposure being slightly off can make for a good image, if Exposure is such that everything is way over or under-exposed the image is unusable.

The third element is focus. This is in reference to both focus itself and focal point. Focus is making sure the image is not blurry and focal is directing the viewer’s eyes where you want them to go.

Let’s Address Exposure First

Exposure is a matter of balancing the three elements of the Exposure Triangle (shutter speed, aperture and ISO) . The easiest way I have found to teach this concept is to break it down by determining two of the elements and use the third to get correct exposure.

What do I mean? For example, make sure your camera is in Manual Mode, set your ISO to say 400, now determine if you want everything in focus or only items closest to the camera with items furthest from the camera blurred (this is an artistic decision). Let’s choose a relatively large aperture, say f5.6. Now select a subject, look through the view finder of the camera and read the meter, if it is to the left or right of centre the image is over or under exposed. The goal is to “zero-out” your meter, that is, place the marker in the centre of the meter scale, to do this you only need to increase or decrease the shutter speed to get the meter marking to the centre.

Once you have done this you have effectively used the Exposure Triangle to correctly expose an image.

You can use this method by “fixing” any two of the three and using the third to zero out your meter.

See how easy it actually is? After a while much of it will become second nature, you will make decisions before you ever put the camera to your eye. Typically, if you are shooting during the day there will be little need to change your ISO unless lighting conditions are changing rapidly, unlikely to happen. So you can “fix” your ISO. You then decide on your depth of focus, Aperture, you fix that, the only thing left is shutter speed and you use that to correct your exposure.

You may decide to “fix” the shutter speed, you may want to create blur in your image, you will set a slow shutter speed, you can again leave your ISO at 400 and set your exposure using your Aperture.

So you see, this proper exposure thing is easy, once you have a basic understanding…….anyone can do it.

Remember that photography is nothing more than the capture of light, the light falling on or the light being reflected from your subject. All you need to do is properly expose for that light.

Since, I stated that I believe that Composition is more important, overall than exposure, I say that because automatic settings in cameras do a pretty good of setting the right exposure and I believe one should learn Composition first.

Composition is nothing more than attracting and keeping the attention of the viewer, at least long enough to truly experience what you have captured.

Without going into too much detail, couple of key Compositional Elements, are:

Rule of Thirds - think of thirds as splitting your view finder into three equal rows and three equal columns……..simply, in your initial learning, never place you subject in the smack dab middle of the frame, that makes for a boring and predictable image, on most occasions. Place the subject in the left third or the right third of the screen. This creates negative space and gives the eye somewhere to go.

When shooting a landscape image where there is the presence of the horizon, never place the horizon in the middle of the frame, again this typically creates a boring and mundane image, place the horizon in the upper of lower third of the frame. This again gives the eye somewhere to wonder across and through the image. If you are shooting a Sunset, put the horizon in the lower third because you want the viewer to focus more on the beauty of the Sunset. If you are shooting a beach scene, for example, your goal is likely to show the beauty of the beach so you would place the horizon higher in the blue sky to have the viewer focus more attention on the beach and its details.

Lead In Lines - this is taking elements that are essentially straight lines, placing them in the frame as if they are pointing the viewer into the scene of toward your ultimate subject, an example would be, there is a line of rocks in the sea that lead to a sailboat in the distance. You would frame the image so that the line do indeed point directly at the sail boat. These line lead the viewer’s eyes into the scene.

I trust this has been of some assistance.


exposure-triangle[1].jpg