
One of the things I love most about teaching photography and passing on knowledge I have gained over these past 40+ years of practicing this art form is watching the reaction of students when they realise how easy taking full control, shooting in Manual Mode, of their camera is.
I am not saying that shooting in manual mode necessarily makes one a better photographer, it simply means being able to fully control the tool in you hands as you wish to control it.
So, what am I getting at?
I watch and follow a large number of photographers and I can say this, as a teacher, I can show you how to operate the equipment, but I cannot teach you the “art” of photography. Achieving proper exposure is the technical side of photography whereas seeing an image and the capture of an image is the “art”.
Let’s have a frank discussion:
Learning how the points of the Exposure Triangle all work together to achieve proper exposure is easy to teach, I have been able to teach that in a matter of minutes to students who had only ever shot in Auto or one of the Auto-Exposure modes on their cameras. This to me is the ground level of photography and everyone with a desire for photography should learn this as an absolute foundation.
The “art” of photography, however, is completely different. I can teach the basis of “compositional rules”, such as the Rule of Thirds, Lead In Lines, Symmetry, etc. but what I cannot teach is how one designs a photoshoot, whether this photoshoot is a Portrait or Fashion shoot, a Product shoot, or a Landscape shoot, that is for the individual eye to see. For example, when I go out with a group of fellow photographers to a location to capture some landscape images, even though we are all shooting from a very similar location, each of us creates a different and unique image because we each see the scene differently and we each determine what the most important element of the scene is to our eye. That is the individual eye and what feels best to each photographer. The same applies when shooting a model in studio, a group of photographers shooting the same model will create different results when given the freedom to set their own lighting and posing. Neither is right, nor wrong because art is subjective.
Here is where some many take some exception to my comments:
The issue I have with much of the people work (portraits, fashion, weddings, etc.) I see today is that the “art” is not necessarily being created by the photographer using the camera, it is being created through image editing software, such that the “final” work looks nothing like what was created by using the camera. The work created by the camera has now become the canvas on which the art is created. This is leading to, in many instances, the work being indistinguishable between photographers. Much of the lighting that creates the initial piece is the same and the way the images are edited is the same, so photographers, to a large degree, do not stand out from each other.
To me, a good photographer creates a technically sound image, properly exposed, properly lit and appropriate posing BUT a great photographer presents an image that is artistically appealing and is able to hold the attention of the viewer beyond just seeing a nicely exposed image. This goes beyond the technical abilities of the photographer, remember I said above that the technical side can be taught and “perfected”. Take a photojournalist, some of the best photojournalistic images may not be the best exposed images but they are captured in a manner that draws the viewer in and hold holds the viewer’s attention, there is an emotion evoked. Again, this is where the “art” that resides in the photographer is on display.
What I am finding is many are chasing the next best thing in photography equipment but does that equipment truly matter in the overall premise of photography, that is to create art. Camera and lens manufacturers are progressing the quality of images produced, that is the way the images are rendered, very sharp, very clean, nearly high-definition images. This advancement, to be very honest, is not of interest to me because coming from an analog (film) background that began over 40 years ago, for me the quality of an image is not in its rendering but in its content.
I do, indeed shoot digital but I have refused to chase technology. My digital cameras are:
Nikon D3s - First produced in 2009 and was discontinued is 2012 when it was replaced with the D4. This is my go to sports photography camera and it is has excellent high ISO performance.
Nikon D3x - First produced in 2008 as a high mega-pixel (24.4mp) for studio, landscape, weddings, etc. It is not a high ISO camera and it is not designed to be a sport photography camera.
Nikon D500 - First produced in 2016. This is a very versatile camera with a high fps and very good high ISO performance. I purchased it more as a travel camera as it is much smaller and lighter than the D3s and the D3x.
So, as you can see, I am quite a few generations behind, but I do not see the need to keep “upgrading” camera bodies. I still believe lens quality is more important.
That being said, if given the choice I would much rather shoot one of my film cameras, my current favourite is the Pentax 6x7.
Film, for me is still what photography is all about, others many differ and that is absolutely fine because as artist we have personal choice over our tools.
Why film?
I have addressed this before and I mentioned it above, for me a quality image is not about how it is rendered but it is the feeling of the image. I simply feel that because film images are not over crisp and clear (sharpness) and have a softer rendering created by the film grain, the images have much more character and life to them than do images being produced today with the high megapixel cameras. For me there is just something about the hands-on nature of shooting film……..with only 10 frames per roll I tend to be much more selective in what I shoot, I am more in-tuned with what I want to produce, not thinking about where I can take the image in edits. Film is about truly taking images one frame at a time, checking and re-checking composition, checking and re-checking exposure by using a spot meter to meter around the scene, determining where I want my shadows to fall in the overall exposure and not pressing the shutter button until I am absolutely certain I have my composition and exposure as I want it.
I know many disagree and I am fine with that…….I still believe that new photographers can benefit by starting the photography process in shooting film, developing is another story. Yes, a digital camera can be a great learning and one can learn very fast on digital, I just think that film teaches the elements of proper exposure and composition a little less forgivingly, resulting in a faster learning curve. Let me explain, with digital cameras the photographer can capture the same image over and over again, nearly an unlimited number of times and adjust the exposure and composition continually and ultimately the photog can get “lucky” but has the photog truly learned in this process? With film, the decision about composition is key, as is the exposure and where the exposure readings are taken from. With film, the photog has to “know” that he has gotten everything right as there is no immediate feedback to make the adjustments. This is where wonderful lessons in photography are on offer.
In closing……it is not my intent to knock those continuing to take advantage of technological advancements in digital photography because if this means these advancements bring more people into the wonderful art form that is a great thing. I would simply advise new(er) photographers to “focus” less emphasis on the rendering of the image and more time on developing his/her photographer’s eye and learn to create images that stand out from the crowd. It is great to follow other photographers but I feel standing out by creating your own style is the better way to go.
I am always open to having these discussions.
Another Photography Class Completed
This past weekend I taught another photography class, I was really looking forward to this class as it was a comprehensive lighting course.
We, my good friend and fellow photog, Rashad Penn of @rashadpennphotography.com, and I have been jointly teaching for the past 5 years. We both hold the view that knowledge is only valuable when it is passed on to others.
Through this class we taught the theory behind lighting, the equipment used, things like wireless triggers and the various flash/speedlight/strobe options, modifiers and lighting patterns. After the theory we had the students shoot images of the model we hired. It was so rewarding to see the students eyes light up when they viewed the images they were capturing.
Below is a sample image I captured as I was teaching how to use a beaty dish and a reflector to create a very simple beauty image.

Sports Photography
I just realised that this is my first blog post for 2021, I really need to up my game and Do Better.
I thought I would touch on Sports Photography with this post. I have touch on this before. Hope you enjoy and I am happy to answer any questions, I also take critique and criticism very well.
Sports Photography is a genre of photography that tends to get overlooked by many sporting bodies. The only time they think about images is after the game is over and they see that there was someone there capturing images so they approach that person and ask if pictures can be sent to the organisation.
Some of the sporting events I shoot are for my own portfolio, for example, my daughter, a competitive swimmer, and her competitors will be my subject for my own records and to freely share with the swim club my daughter is a member of, a parent run club. However, for many events I work under contract and have a time frame within which to deliver images and there are certain images I know I need to capture to fulfill my obligations.
Sports Photography is not for everyone because for the entire time you are on site your need to be keenly aware and be ready to shoot the action as it happens. Sports Photography is also not an inexpensive genre to shoot because of the equipment that makes life easier, long lenses to be able to fill the frame from a distance, fast aperture lenses, cameras that are capable of a high frames per second (FPS), although this is less important than other features like high ISO capability because many sports occur at night and under stadium lights. To the human eye the lights may seem bright but to a camera sensor the scenery is dark and the only way to get sufficient light to the sensor to properly expose is to use high ISO. High ISO introduces noise that degrades the quality of the image. Some cameras are designed to shoot relatively clean images at high ISO. For example, for my sports work I use older Nikon D3s camera bodies, which I can very comfortably shoot at ISO 6000 or 8000 and still have very usable images without much denoise editing.
When I am under contract there are stock images that I need to get for delivery to the client, for example, Football (Soccer) players in action running with ball down the flanks, getting round an opposing player or the opposing player going in for a successful slide tackle. It could be a 100m sprinter that I capture mid-race at a high shutter speed to freeze the action or it could be a long jumper jumping into the pit coming toward the camera. Once I have the stock images I need to deliver I can begin to play, one thing I will often do is set a slow shutter speed and pan the athlete to show some movement. or I will use a shutter speed that will freeze the head and torso of the athlete but allow some blurring of hands and feet to create a sense of movement.
Many do not see Sports Photography as an artform but just as with any other genre of photography, art can indeed be created while shooting sports.
I enjoy shooting sports because sports can be very emotional, anger, frustration, joy or pain are ever present in sports. I also enjoy shooting sports because it is truly the capture of fleeting moments that the human eye will often overlook and the brain will ne register, often times these moments come outside of heated action with opponents.
When shooting sports that involve a ball, Football (Soccer), Golf, Cricket, etc. if I capture an image, no matter how good the image is from a focus and sharpness perspective, I will not publish that image because to me the ball must be in the frame. An image of two footballers going up to head a ball just looks like two players jumping if the ball is not in the frame, if the footballer is kicking the ball and the ball is not in frame, it is just someone swinging his/her leg. The golf swing is the same way, if the ball is not in the shot and it is an action shot, it is just someone swinging a golf club, it could very well be a practice swing. Some may disagree with my position on this but for my own work this is of paramount important.
In closing, it is up to us to help sporting organisations to under stand the importance of photos of event for the documenting of history, a still photo can be published and printed, video requires too many variables to share on a continuous basis and video does not provide the hard, tangible product.
If Sports Photography is of interest to you starting the going to little league baseball, mini-minor football and capture images there as practice. This would also tell you if you are cut out for Sports Photography and help you to decide if the investment in the equipment needed to shoot contractable (may not be a word) work is something you wish to do.
What’s in my Sports Photography bag?
2 - Nikon D3s bodies
1 - Nikon D500 body (this is used when there is good available light and I can keep ISO below 1200
1 - Nikon 200-400mm f4 zoom
1 - Nikon 300mm f2.8
1 - Nikon 70-200mm f2.8
1 - Nikon 24-70mm f2.8 or 28-70mm f2.8
1 - Nikon 14-24mm f2.8
1 - Sturdy Monopod
1 - Portable stool
Pocket Wizards transmitters/receivers for remote camera shooting
Charged batteries
A number of Compart Flash (CF) Cards with a minimum of 32GB capacity (my D3s bodies take 2 each)
A number XQD Cards for use in my D500 body
Towel to wipe my hands and wipe away any sweat from my face

Timing is Sports Photography is key….always be aware
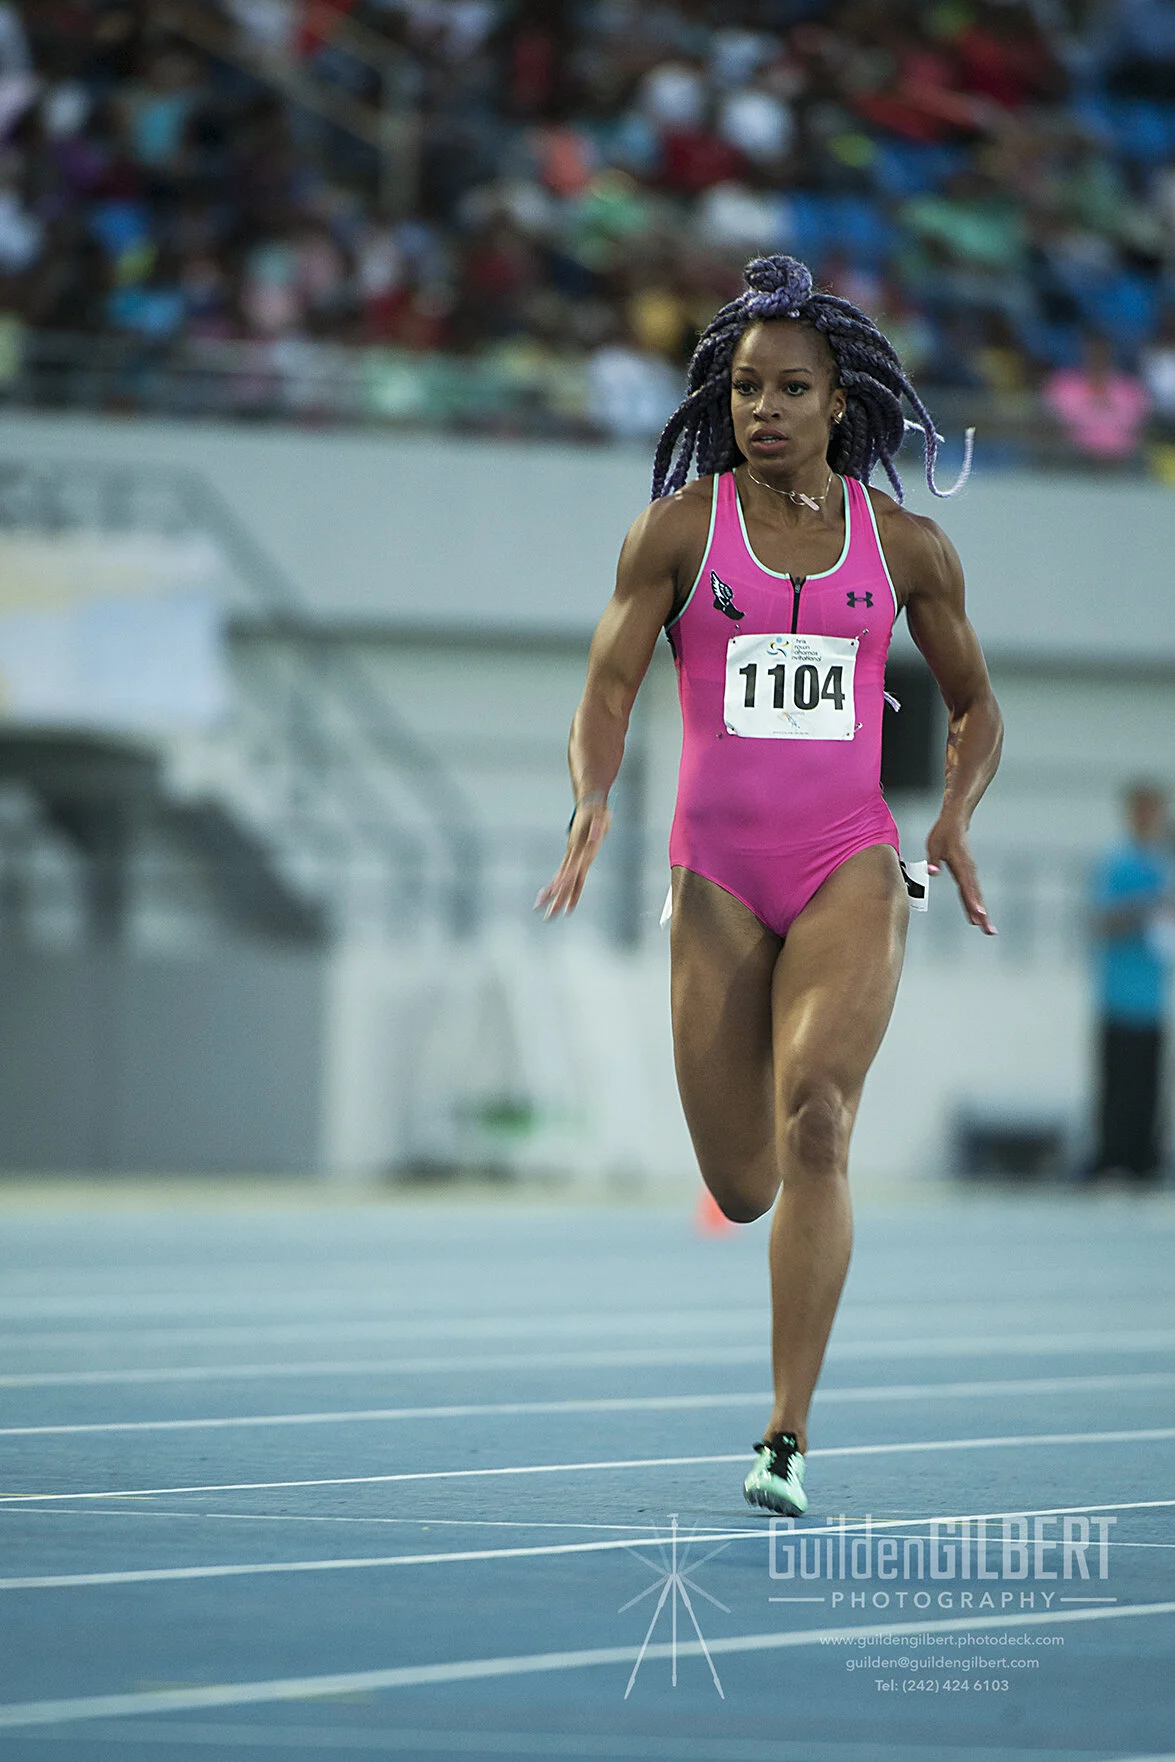
“Stock” image of runner frozen in mid-stride - Natasha Hasting, 2 time Olympic Gold Medalist, 400m Diva

When keeping a keen interesting shots appear

Bowled - Even though it was just bails being removed, I captured this by remaining “focused” the task

For greater impact the ball must be in the frame

To avoid it looking like a practice swing the ball must be in the shot

Without the ball I tend to go for more of a portrait
Why Digital Photogs Should Shoot Film
This is not a post about Digital vs Film, it is not a post to claim one is better than the other, the intent of this post is to illicit a thought.
Reasons why every digital photog should shoot film, at least for a period of time. These are in no particular order
1) Shooting film slows your shooting process down. Unlike digital, where you can shoot and shoot and worry about processing later to correct errors and straighten images, etc., with film you have a limited number of frames per roll (24 or 36 in 35mm and between 10 and 15 for medium format, 120 film), this limited number of frames forces you to properly compose and meter. With film, every frame you expose comes at an expense, once the frame is exposed it cannot be deleted and it has to go through the development process. The need to be more meticulous, so as not to waste any frames, affords for the “training” of your photographer’s eye, this means you will improve your compositional and metering skills……making you a better photographer at the end of the day.
2) Shooting film requires patience. Unlike digital, when you expose a frame on film you cannot review the image on the back of the camera, you have to wait to process the film, if you process yourself, or wait for the developed film to be returned to you from the lab. This means you have to patiently wait before you can review what you have shot…….this make the above reason, proper composition and metering, more important because you may be unable to re-shoot the images.
3) Image quality. The use of film generally affords you a broader dynamic range. Films like Kodak Portra, for example, will allow you too over expose up to 5 or 6 stops and still retain the highlight details. Every the best and most expensive digital cameras will not afford you such leeway. Yes, some film stocks will produce grainy images but you can also control the grain through exposure and development. The below image of the straw bags was shot on Kodak TMax 400, a low grain B&W film, as you can see grain is nearly non-existent. However, grain in film is different from noise in digital, the grain, by many, including myself, view grain as part of the beauty of film photography…….ask yourself why there are so many digital editing presets looking to replicate film grain.
4) The here and now. How many times have you been shooting a subject and after even capture, or every few captures, do you stop to review the image(s)? This takes you out of the being present with your subject, it is a disconnect. This is important because if you are shooting a model the best images result from developing a photographic connection with the model, each time you stop to look at your screen you create a disconnect and depending how long you take to review and make adjustments the more time your model is waiting for you. Stopping to review could also result in missed photo opportunities. With film you don’t have this issue because you have nothing to review.
Again, this is not about one being better or worse but it is intended to help you to understand how shooting film, even casually, can improve your digital photography work and your workflow.
Happy, as always, to discuss this and any other photography subject.

Shooting Film vs Shooting Digital
On the surface, the immediate difference between shooting film and shooting digital is that with digital you get instantaneous feedback on the image you have captured by looking at the review screen on the back of the camera. With film you really do not know what you have until the developed film comes out of the development tank, dries and you scan it. Although, once you truly understand the exposure triangle and are comfortable with it you actually do know what you have captured.
Beyond the ability to review or not review the basic difference between shooting film vs digital is how images are exposed.
With digital it is important to expose for the highlights because if the highlights are blown out there is no detail in those areas to work with, if you have the Highlights feature of your camera turned on you will see blinking in the over exposed areas, further, if you understand the histogram, an image that has over exposed highlights will have a histogram that has a high peak on the left hand side.
Since film has a greater dynamic range, the latitude between highlights and shadows while retain detail in both, than digital and because film needs more light than digital the phrase, “expose for the shadows and develop for the highlights” is often espoused, that is really more applicable to sheet film than it is to roll film because you can exposure and develop each sheet differently. With roll film you drop the film in the development tank and the entire roll receives the same developing process. My advice when shooting film is to err on the side of over exposure because film needs light and it very easily retains highlight details when over exposed. Under exposure in film causes muddied and unflattering shadow detail.
The other important difference between shooting film vs digital is that with film you are essentially stuck with the ISO you have selected for the film that is in the camera, you either shoot at the box speed ISO of the film, or you push the film (rate and expose the film at an ISO speed faster than the box ISO, for example, you rate an ISO 400 speed film at ISO 800, thus under-exposing the film) or you pull the film (rate and expose the film at an ISO speed slower than the box ISO, for example, you rate an ISO 400 speed film at ISO 200, thus over-exposing the film). When you push or pull the film you compensate for the difference in your development time. Will digital you can shoot every single frame at a different ISO because each frame is a completely separate digital file.
As a side note, there is a film development process that will allow the photographer to develop roll film where the ISO rating has been varied within the roll……..Stand Development. I will write about my experiences with Stand Development in another blog post.
Beyond these differences between shooting film vs digital it is still photography and the rules of exposure and composition remain across the formats. I encourage everyone to pick up a camera and record the World around it as seem only through your eyes.
Shooting Golf
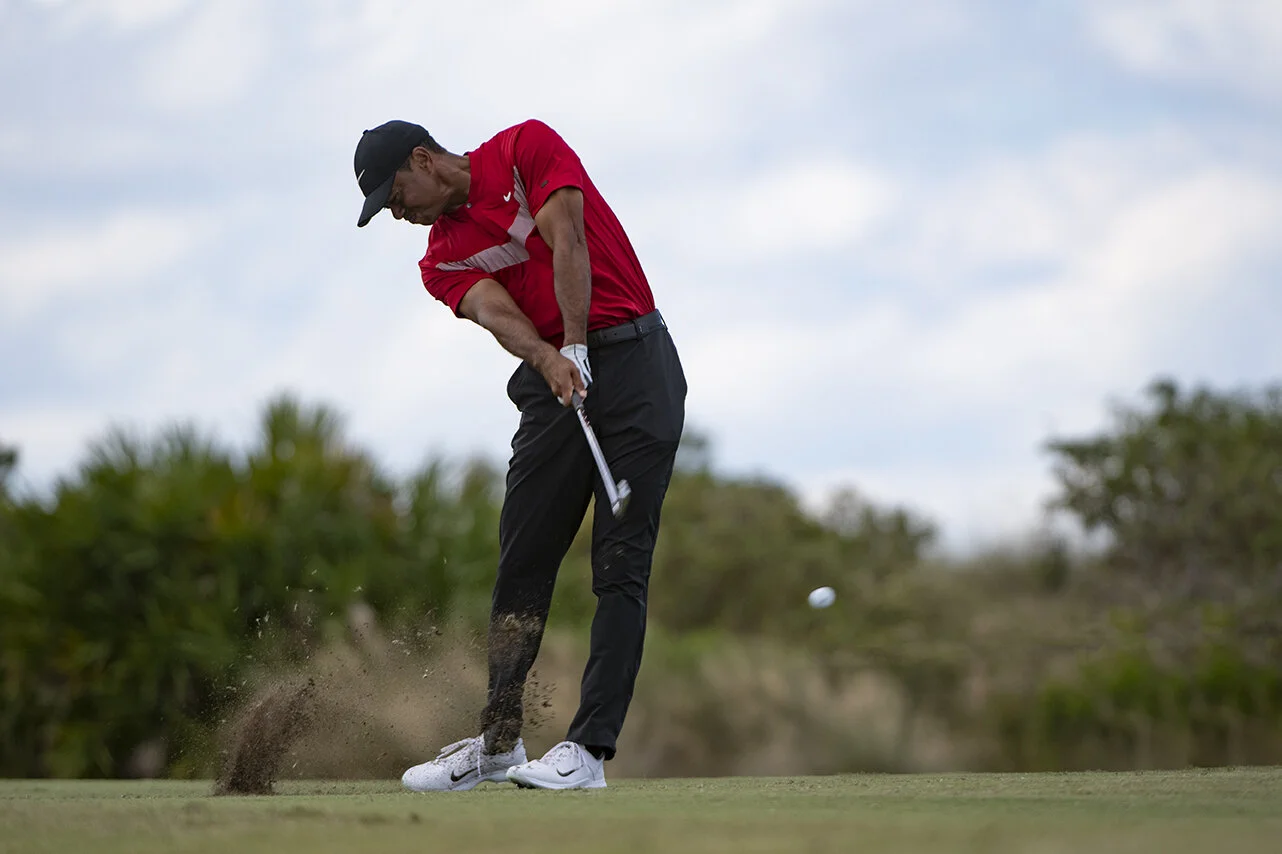
This week I had the opportunity to shoot the Hero World Challenge hosted by Tiger Woods and held at the Albany Golf Course here in the Bahamas. Below are a few things I learned from shooting golf for the first time.
Lesson No. 1
NEVER, NEVER, NEVER be a disturbance to the golfer, be invisible. This means you DO NOT release your shutter to capture an image until the golfer has hit the ball, unless you are far enough away, with a long enough lens, so that the golfer will not hear your shutter. NEVER capture an image during practice swings, with the caveat of distance being in play, as mentioned just now and NEVER capture an image during the back swing.
Lesson No. 2
This is very much related to No.1
While my cameras can run off 10 frames per second (fps) I found timing to capture the image I wanted was a much better approach to shooting than just holding the shutter button down to “spray and pray”. Here’s the thing, I truly believe that any sport that involves a ball MUST have the ball included in any action shots and to accomplish that in a sport like Golf is more about timing than fps. I discovered that for action shots there is impact with the ball, the follow through and the reaction, if any, from the golfer. You see holding the shutter down and using maximum fps creates two problems:
1) You will end up with hundreds, if not thousands of shots during a tournament that can be deemed unusable, that is, the ball is not in the shot.
2) Often times when firing off 10 fps you will still miss the point of impact or just after impact
So how did I accomplish my goal? I simply locked my focus, I use back button focus ALWAYS, I looked through the view finder and watch the movement of the golf club, once the golfer unwound to play the shot I would wait a split second and fire the trigger. No, this will not always be successful but I got some pretty good keepers. Unsurprisingly much of my “focus” was on Tiger Woods, big surprise there……and to be honest, I found timing his impact to be a real challenge. The two days I shot the event Tiger was paired with Justin Thomas and I could nail the impact or immediate post impact of Justin time and time again but with Tiger I continued to fail. it got frustrating for a while………then I learned the next lesson……
Lesson No. 3
When used correctly, using the maximum fps was actually a much better option than single shot…….so that throws No. 2 out the window…..well not really because there were times I did use the single shot in quiet mode with success.
Ok, so why did I first say I learned not to use maximum fps and now I say I found to be a better option?
I treated the maximum fps in the same manner as I did the single shot, I looked to time the impact of club face to ball and the extra fps almost guaranteed my success. While you should not capture an image until after the ball has been struck, timing remains key but the extra couple of frames allowed to capture the dirt moved from the divot and allowed me to include the ball in the frame. See examples below.
Lesson No. 4
This is one very simple, you do not always have to shoot at the widest aperture, there were often times I stopped down to f5.6. I was close enough that f5.6 would allow me to blur the back ground but still get more depth of focus on the golfer’s face.
What I really learned
Shooting golf successfully is all a matter of timing.
Other shots to capture to round out the portfolio from a Golf Tournament:
Capture the golfers follow through
Capture the golfers putting and include the hole in the image
Capture pitch shots and chips
Capture bunker play
Sometimes shoot a little wider to get a sense of space
I trust this has been of interest and as always I welcome questions and/or comments.
In case you were wondering about the gear I used for capturing this event:
Nikon D500 (DX body)
Nikon D3s (older full frame body)
Nikon 200-400mm f4 lens
Nikon 70-200mm f2.8 lens


More reasons why I still love to shoot film
If one takes a look at my camera gear one would realise that I am not one who is interested in keeping up with the latest photography equipment. For digital, while I have a Nikon D500, it’s always good to have a crop sensor body for the “add reach” when you need it, the vast majority of my digital work is done on one of, or both of my Nikon D3s camera bodies.
I am also not really inclined to buy new because there are so many great deals on the used market to be had. For my sports work I have a Nikon 200-400mm f4 and a 300mm f2.8, neither is the current model and both were purchased used and both were/are in excellent condition.
I say all of that to say that you don’t need to have the most current equipment to capture great shots, I would say I do pretty well in capturing images……..that brings me back to the topic of this post……Shooting Film.
Please take all of this simply as my personal view and my personal approach to photography, I would never make the comment, without the caveat, “for me”, that Film is better than Digital. I think they both have their pros and cons. Digital will provide you with very “clean” and “perfect” images where Film will always give you those “perfectly imperfect” images.
So, why do I still love to shoot film?
1) Film provides a tangible negative, that is, I can touch and feel it, where digital files are intangible and are stored on a computer of hard drive.
2) Film give the element of anticipation, I still get those feelings of excitement when I pull a roll of film out of the development tank to see what I captured, digital gives you this feedback immediately.
3) I take way fewer shoots on film than I do on digital.
4) Film gives a grainy imperfect image, digital images, outside of noise from using very high ISO, are almost hi-definition.
5) I love the act, or art of processing using those chemicals that emit that familiar and nostalgic smell.
So lets take each point and expand it a little:
1) I am sure we have all been there, I know I have, where we have captured images on a digital camera and neglected to back them up on a second (or third) hard drive and the drive we saved them on crashes and the images are lost forever, unless we wish to pay the high cost of going through data recovery. With film there is the hard copy of the negative that can be physically stored and pulled out 20, 30, or 50+ years later and still be used to make a print. I go through some of my photo albums that have images I captured on my Canon AE-1 back in university in the mid-1980s and the memories come flooding back. To look at the images I have captured on digital I have to open my laptop, attach the appropriate hard drive, find the file with the image I am looking for and then open said. This is because the vast majority of digital images are never printed, they are captured and then they take up space on a hard drive, or if you back up the files, they take up space on multiple hard drives.
Granted, in the film environment today we capture the image, develop the film and scan the images to a hard drive…….however, there is the tangible film, or negative.
2) Yes, with digital we get the instant feedback of what the image looks like on the back of the camera, FOR ME, I love film because there is not that instant feedback, I simply know that I captured the image as I saw it in my mind’s eye but I have to wait for the confirmation. To me that is one of the great things about shooting film, you have to completely trust your ability as a photographer to read the scene and to determine how you get the exposure you want in the scene. For example, I use the Zone System when shooting film so I first determine where I want my shadows to fall on the Zone, typically, I place my shadows in Zone 3 or 4, this gives me the deep shadows and I can retain a little more detail in the highlights.
3) Since I use the Zone System my image making tends to be longer when shooting film then when shooting digital. This and the fact that when shooting medium format film I only get 10 exposures per roll, I become much more meticulous in my shooting. I will typically only capture one frame of the scene unless I change perspective. With digital I find I am always looking for that absolute perfect image, both from an exposure and a compositional perspective so I will shoot multiple frames of the same image and select the best one after uploading the files. What I often find is that because I have multiple images of the same scene selection becomes an issue. With film because I have been so meticulous I tend to capture the images I want in one frame……..no selections to go through.
4) What I absolutely love about film is the lack of perfection in the image, the image will never appear to be as sharply focused as a digital image because the grain in film will not allow for the same level of sharpness. There is just something “raw” about an image captured on film that digital simply cannot give you. Sure there are editing presets that will allow you to process digital images to resemble film……..for me that defeats the purpose, why not just shoot film if you want the film look?
5) For me there is a feeling of the creation of art when shooting and developing film. After capture there is the process of removing the undeveloped film from the film cartridge or roll to the development spool and into the light-proof development tank. There is the mixing of the chemicals to match how you want to develop, there is the art of agitating during the development process, there are many different ways to agitate during the development process and each person uses the one way that gives them comfort. There is a theory that the faster you agitate the more grainy the images will be….I am not certain this theory has proven to be correct. The stop bath, very simply, stops the effects of the developer, that is, it stops the development process, from there we have the fixing process which make the development of the film permanent, in other words, after the fixing process is complete you can safely expose that roll of film, now a negative, to light without destroying it. The final stage is is the wash to removal all chemical residue from the roll of film/negative and then hang it up to dry.
So, in a nutshell, what I truly love about shooting and developing film is the hands on process from start to finish…….it is the creation or making of an image rather than “taking” an image.
Film is not for everyone but I think every photographer should at least give it a try even if it is just to see first hand how far the method of capturing and image has come.
I trust you have enjoyed this blog post, feel free to leave a comment.
Below are some images, similar in nature, show the difference in look between film and digital:

Captured on a Pentax 6x7 with Kodak TriX400 120Film

Captured on a Nikon D3s digital camera
Panning Photography
There are a number of photography groups on Facebook that I participate in and one of my new favourites is Bermuda Art Unlimited (https://www.facebook.com/groups/2210893659027826/?multi_permalinks=2253971418053383%2C2253813988069126%2C2253797191404139%2C2253809871402871¬if_id=1562661983132099¬if_t=group_activity) . This is a newly created page with a focus on photography and photography projects for Bermudians.
Each week there is a challenge posted and this week (8th July, 2019) is Black & White Intentional Motion Photography #BWIMP. I submitted the below image and was asked how it was created and whether Ii would be willing to disclose my process to creating it. Always happy to talk photography and now that I am teaching photography it is even more fun to talk about it and methods to achieve different looks.
To create and image like this, very easy for those of us who know our way around a camera and how to achieve proper exposure, is to understand the Exposure Triangle. This is a topic I have posted about previously and will give an overview here. I will also drop a diagram of the Exposure Triangle below.
Very simply the Exposure Triangle is made up of the the three key elements of proper exposure, Shutter Speed, Aperture and ISO. Essentially each of these works inversely to each other, that is, the faster your Shutter Speed the larger your Aperture needs to be and the higher your ISO needs to be……….Kind of…….
Let me explain further, most students that take our classes have never shot in Manual Mode because they have a hard time understanding Shutter Speed to Aperture to ISO. Our first goal is to get them to gain an understanding of the Exposure Triangle and then getting them to apply what we have taught through application. So, here is how I teach it:
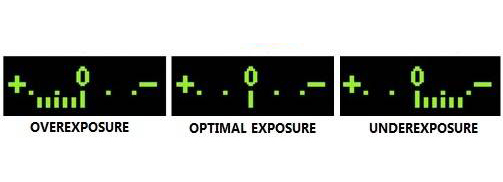
Yes, there are three variables to the Exposure Triangle but you can make some decisions before hand that make gaining proper exposure easier. First, if we are out in sunlight you can preset your ISO, my recommendation is anything from ISO 100 to ISO 400, now that you have set that determine when you want shallow depth of focus or broad depth of focus, that is do, you want to blur the background (large aperture…….f1.4, f1.8, f2, f3.5, f4.6, f5.6), once this is done the only variable remaining is your shutter speed. So once you have set the ISO and Aperture you simply look through the viewfinder while framing your subject and zero out the meter in your camera (see examples of meters seen through the view finder below), note the one that says “Properly Exposed at Zero,this is what we are trying to achieve. So once you have set the ISO and Aperture you need only adjust your Shutter Speed faster, e.g. 1/200th, or slower, e.g. 1/50th to more the needle to Zero.
Another example is you preset your ISO as above, but now you want to control when the image will exhibit some blur (motion), so you set a slow Shutter Speed, maybe around 1/15th. Now to zero out your meter you will need to adjust your Aperture one way or the other.
Finally, if you are shooting in lower light conditions you will need to first set your Shutter Speed and Aperture and use the ISO to zero out your meter. For example, you are in a park just after Sun set, there will be very little ambient light from the Sun but you want to freeze the movement of, say your dog, You will first set a relatively fast Shutter Speed (1/500th - 1/1000th) then because you want to blur the background you know you will need a larger Aperture, say f5.6 (most consumer lens will offer this as one of the larger Apertures). Once you have done this and you look through the view finder you realise that the meter is showing under-exposure, that is the camera is telling you the image will be dark. To counter this you will need to adjust your ISO, you know from above that in brighter light you will use an ISO of 200 or 400, so you know that you need to now increase your ISO to say, 1000. Now your meter tells you the image will be properly exposed. You take the shot and get confirmation.
Essentially, the ISO setting determines how sensitive the camera sensor (or with analog photography, the film) is to light. I will not discuss it here but the higher your ISO the more noise or grain will appear in your image. This is for another discussion.
So, now you have an idea of how to set your camera exposure manually.
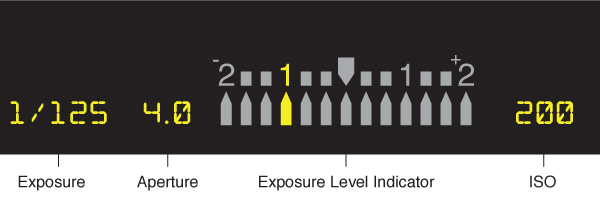
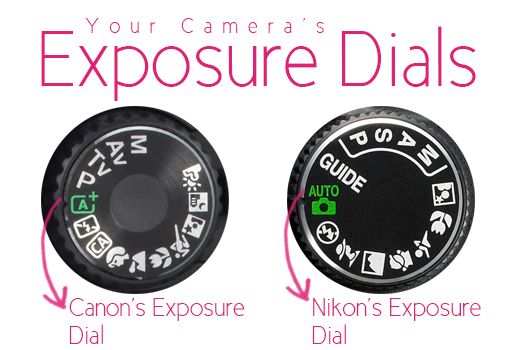
With all that being said, virtually all digital cameras will have exposure dials that look like the below. Canon and Nikon are shown in the image but this will be fairly consistent across brands. We want to focus on Tv for Canon and S for Nikon.
These symbols represent Shutter Priority, in other words you are telling the camera you want to control the Shutter Speed but it it to control the Aperture, remember, you have pre-determined the ISO you will use or you can set ISO to Auto and let the camera decide. I am a proponent of manually selecting the ISO to avoid ti going too high, see my comment about noise above.
Ok, so we have selected Shutter Priority, now to create an image of a car speeding through the scene you will first need to select a slow Shutter Speed, don’t go too slow at first or you will get frustrated at the results. I suggest starting with a minimum Shutter Speed of 1/50th, make sure your focus point is in the centre of the view finder, to confirm this look through the view finder and half press the shutter button as you would to achieve auto focus, there will be a red square, that is the focus point, if it is not in the centre, use the toggle arrows to move it there (I have to assume you know how to move your focus point).
Now that we have the camera in Shutter Priority, have set our Shutter Speed to 1/50th and we have we have the focus point in the middle of the viewfinder, the next step is to set the camera to capture its faster frames per second (fps), again I have to assume to know how to set this option. Now before we start to shoot, the last step is to set the camera to continuous focus mode, you will no longer hear a beep when you achieve focus, whenever you half press the shutter button and move the camera the camera will be continually trying to find focus.
Ok, so we have all of this set up and we are ready to go. Once you see a car arriving point the camera at the car, make sure the focus point is on the car, press the shutter button, holding it down continuously, now follow the car with the camera, as if you are tracking it (which is what you are doing), continue to do this until the car has gone past you then release the shutter button. You will now have a series of images of the car, some may be out of focus but you are likely to have some in very good focus. You have just completed the photography skill/technique called Panning. This can be done with any moving subject, a car, a runner, an animal, a person. To create a more dramatic sense of movement practice with very slow shutter speeds, your keep rate will drop but the photos will become more dramatic.
Why does this happen? Because you have used a slow shutter speed any movement of the camera will create blur, this blur will not be seen in the car because you are moving (or trying to move) the camera at the same speed as the car, s to the camera the car is still. So go out and try it.
Most people, when shooting vehicles will use a fast shutter speed to freeze the vehicle but the reality is you can just take a picture of a parked car and get the same result. With a correct panning technique the slow shutter speed will blur the wheels of the car because the wheels are turning at a faster pace than the car is moving. This also gives the feel of movement.
Hopefully this has been helpful, feel free to leave any comments or feedback below.


What Constitutes a Strong Image - My View
So, what do I BELIEVE are the components that make a good or great image?
This will be relatively short as I see this as an introduction of this topic, from my perspective.
1) First and foremost the viewer of the image should not have to guess what the subject of the image is. The eye of the viewer should go straight to the subject or be led, uninterrupted to the subject, very quickly.
2) The image should provide “balance” for the eye. To me this means that the composition of the image should feel natural to the eye, unless the goal is abstract.
3) There should be contrast between the subject and the other elements of the image. This does not mean that it needs to be a high contrast image but there should be a difference colour, lighting, toning, etc. between the subject and the other elements of the image so the subject stands out. This is very similar to No. 1.
4) The use of Lead In (Leading) Lines. This is when there is a distinct “line” within the image that leads the viewer’s eye through the image to a specific element in the image. The most obvious one would be using railroad tracks leading to a train, there is no doubt where the tracks are leading. This creates intrigue andn the eye wants to follow these lines to “see” where they lead.
How to meet these components:
Use of aperture to “isolate” the subject. A larger aperture will have the subject in focus with other, less important elements, out of focus……..this is Bokeh
Use of the Rule of Thirds. Divide the focus screen, either mentally or by turning on the grid within the viewfinder, and place the subject within one of the thirds. Many will say the subject should not be placed directly in the middle third, but there are occasions where it is effective to place the subject in the middle, for example, when capturing a portrait in portrait orientation most of the subject will likely be in the middle but the characteristics, the eyes, may be “off-centre”. For landscape images where there is a clear horizon I would say determine which area of the scene shall carry the most weight, the sky or the ground. This determination can made based on where the most interesting elements are. For example, if you are wanting to portray dark storm clouds then it would be appropriate to give the clouds the most weight. If you are wanting to show the lights of a city you will minimise the sky.
With regard to contrast, make certain your subject does not blend into the background by being the same colour thus “getting lost” in the background.
Use something within the image that will causes the viewer’s eyes to be directed through the frame to a specific location of element.
I have added a few images of mine that I believe are strong images and meet the parameters mentioned.
In the first image of the swimmer, I have placed him (key element is his goggles/eyes) in the upper left third and have left enough negative space, camera right, to allow for him to swim into.
In the second image I have used the Rule of Thirds in two ways, clearly the sky has more interesting elements than the water so I have given the sky more prominance. The use of the Coconut Tree, right third, has given a place of reference and works with the water to say, “Welcome to the Tropics, come on in”
In the third image the subject is very, very clear, it is the observation tower and the horizon leads the eye to the subject. I have also used the Rule of Thirds again and there is “contrast” between the subject and the background.
In the fourth images, again I have used the Rule of Thirds but more pronounced is the use of the rocks as a Lead In Line. The rocks start in the lower left third and lead the eye into and through the image to the sailboat, giving the feel of this is where you go to unwind and relax.
The final image is essentially a portrait of a Flamingo and while the bird is relatively centered its head sits in the upper left third creating balance in the image. I have used a large Aperture, the smaller the number, the larger the Aperture and greater the background will be out of focus. Note that the key focus is on the eyes of the Flaming, that is because whenever you take a photo of something with eyes, a person or an animal the eyes must be the focal point.


Sports Photography
One genre of photography I thoroughly enjoy and I have had many opportunities to shoot is Sports Photography.
Sports Photography is not as easy a genre as some may believe it is to shoot , especially action and fast moving sports, as a photographer you always have to be alert as moments are fleeting. Also, location and positioning relative to the action is key to shooting quality sports images.
You will see from images under my Portfolio and on my other website (www.guildengilbert.photodeck.com) I very often look to fill the frame with my subject and there are times where I will shoot at a slower shutter speed in order to show movement of the athlete.
Sport Photography can make you feel exhausted after the event because you have to be so “focused” on capturing the right images at the right time that it takes total and complete concentration.
Camera Settings I typically shoot in Manual mode because first and foremost my initial objective is to freeze the action so I know I will need a fast shutter speed (different sports require different shutter speeds in order to freeze), after my shutter speed I will manually adjust my ISO based on lighting conditions and changes in those conditions and on most occasions I look to isolate the subject from the background so I generally will shoot my Aperture wide open.
Shutter Speeds For events like swimming my minimum Shutter Speed is around 1/2000th, not so much to freeze the swimmer, as that can be done with a slower shutter speed but more so to freeze the water being splashed/pushed by the swimmer. For Football (sorry, I find it blasphemy to call it by the name beginning with “S” that some called) I find I can comfortably get away with Shutter Speeds as low at 1/1000th or sometimes even a little slower. For Football I do not mind having a little bit of blur in the extremities of the players because it invokes a feeling of movement. For Track and Field, when I am looking to freeze the subject I know I need to be up around 1/2500th but as with Football, I often want a little bit of motion blur in the extremities, so often times I will shoot at slightly slower shutter speeds.
Equipment I am a Nikon shooter, there, I said it………But seriously, camera brand does not matter. Below is a list of the gear I typically carry:
Nikon D3s (older technology but still very much relevant and a great high ISO performer)
Nikon D500
Nikon 24-70mm f2.8
Nikon 70-200mm f2.8
Nikon 300mm f2.8
Nikon 200-400 f4
There also times I will go as wide as a 14-24mm f2.8 for perspective or when using the stadium as a background.
For Track and Field and sometimes during Football I will use a Monopod but often times, even with the 200-400mm I will shoot handheld because it affords me more maneuverability.
As I mentioned above I often times look to fill the frame so more times than not I will be using my 200-400mm or 300mm to achieve that.
The key, in my mind, when shooting sports is timing of the capture and in sports where a ball is used I always look to include the ball, otherwise the subject just looks to be in a strange body position. I have included images from some of my Sports Photography work to give you some examples.
As always, I welcome any questions or general feedback.


Is the Zone System Applicable to Digital?
As most who know me know that much of my photography these days revolves around shooting film, principally using a Pentax 6x7 Medium Format camera and those with whom I have spoken with about this will note that I use the Zone System, a photographic technique for determining optimal film exposure and development, formulated by Ansel Adams and Fred Archer.
The Zone System assigns numbers from 0 through 10 to different brightness values, with 0 representing black, 5 middle gray, and 10 pure white; these values are known as zones.
Yesterday, my teaching partner, Rashad Penn (www.rashadpennphotography.com) and I taught an advanced photography class and during this class we presented the Zone System to the students. These students obviously shoot digital and with the help of http://www.myphotocentral.com/articles/zone-system-for-digital-exposures/#respond we presented the images at the bottom of this post to show that the Zone System is indeed applicable to digital and we were able to show the students how to apply the Zone System to their shooting process.
As can be seen in the image only Zone III through Zone VII are applicable to the vast majority of digital camera sensors as the dynamic range of these sensors is from -2EV to +2EV, anything outside these ranges will result is no data being available within the image.
One thing newer photogs should understand is that unlike film that requires a lot of light to gain proper exposure digital actually requires less light, in fact, it is better to under-expose in digital photography and to bring shadow detail out in post processing. Film has a higher dynamic range than does digital.
When shooting film, I meter for the shadows, determine which Zone I want the shadows to be in for the final image but for digital I meter for the highlights. There will be occasion, with digital, that the dynamic range of the scene will fall outside the capability of the sensor. At those times, depending on what I want to use the image for, Ii will either severely under-exposed to retain highlights, knowing that some of the shadow detail will not be retrievable, I will look for a composition to exclude much of the highlights or I will forgo the capture altogether if I can return to the scene under better lighting conditions.
So, how do I recommend using the Zone System in digital? I suggest finding a midtone, within the scene and which will be included in your composition, meter off this midtone and zero out the meter in your camera. Once you have done this increase your shutter speed so that the marking on the meter in your camera is one bar to the left, this should be 1/3rd to a 1/2 stop under-exposed, capture the image and this should result in a very slightly under-exposed image that can be adjusted in post processing. The reality is, unless the difference between your highlights and shadows falls within -2EV and +2EV, highly unlikely in bright sunny conditions, when most of those who use their cameras for capturing family moments are likely to shoot, you cannot get it completely right in camera but you are better off, with digital, to under-expose than you are to over-expose.
I don’t have a Gray Card so how do I find a midtone?
To find a midtone within the scene look for reds or greens or even whites in full shadow. Barring that……I bet most are completely unaware of this…………..open your camera bag and in the majority of cases what you will find is that the inside liner and dividers of your camera bag are………..very close to, if not, 18% gray. Pull out one of the dividers, place it in the same light as your subject and meter off this. If the dividers are not removable place your camera bag in the scene, lift the top flap of the bag and meter off the inside.
This has been a very broad overview of the use of the Zone System in digital photography.
There is a vast amount of information online about the Zone System but a couple of pages I think you will find helpful, including the one I provided a link for above are:
http://www.myphotocentral.com/articles/zone-system-for-digital-exposures/#respond
https://luminous-landscape.com/zone-system/
https://photography.tutsplus.com/tutorials/understanding-using-ansel-adams-zone-system--photo-5607
I hope this article has be helpful and insightful for you and I welcome your feedback. Leave me a comment in the Comments section. Also include any topics you would to see me cover.
Thank you for your time and attention.


B&W Film vs Colour Film
I am thoroughly enjoying my return to shooting and developing film. I have to be honest though, while I do like the more muted colours I am getting from shooting Portra, colour film, my preference is B&W film because B&W offers no distraction., which is what colour can sometimes bring. Often times the colour in an image is more noticeable than the image itself.
“When you photograph people in color, you photograph their clothes. But when you photograph people in Black and white, you photograph their souls!”
Ted Grant
I agree with this.
Why do I love B&W
I love B&W principally because of what I said above, there is no colour to distract the eye. However, something that is right up there with that……..heavy contrast.
If you look at my B&W images, film or digital, you will see that my images are contrasty. With digital much if this comes in post processing because digital has less dynamic range than film. With film I get the contrast I want by using the Zone System:
https://www.alanrossphotography.com/ansel-adams-zone-system/
In short, the Zone System uses a scale from 0 to 10, where 0 is pure black and 10 is pure white. Zone 5 is middle gray or 18% gray.
I use an old Pentax Digital Spot meter, which when pointed at something within the scene, typically the darkest shadow detail, gives me an exposure reading number. I put that reading into Zone 5, which is 18% gray. As I don't want my shadows to be 18% gray, depending on the scene and what image I have in my mind, I will place the shadows in Zone 3. In doing this I can retain some details in the shadows.
“Expose for the shadows and develop for the highlights “
Granted the Zone System was really developed for sheet film but I have been happy with the results i get from rolled film, 35mm or 120.
I typically shoot at box speed and develop normally.
Truth be told, where I have pushed the film, that is shooting ISO 400 film at say ISO 800 or ISO 1600, I do get more contrast but I also get more film grain. I love grain but as I primarily shoot Kodak Tri-X 400 I tend to get sufficient grain shooting at box speed, with normal development in Rodinal developer.
So, the bottomline is I am thoroughly enjoy going back to my roots in film and for 2019 I have only used my digital cameras twice, both times for sporting events.


Change Platform or Adding a New Platform
I have had a web site for a number of years (www.guildengilbert.photodeck.com) but the platform does not have a Blog option so I have created this new platform using @squarespace and will likely do away with my other page at some point but for now I will be running them concurrently as I transition.
Why I decided to Teach Photography
For nearly as long as I have known myself I have had a fascination with pictures.
As I got older this fascination grew and became a passion. When I first learned photography, most professional photographers were unwilling to teach someone who could potentially become their competitor, so pretty much learned on my own, through trial and error and experimentation. After “practicing” this wonderful art form for nearly 40 years I have garnered a whole lot of knowledge and what good is knowledge if you don’t share it?
I never viewed photography as overly difficult but there are some technical aspects that one must learn in order to capture the beginnings of a quality image.
While each element of photography works in unison to create a great image when first learning photography there are steps one can take to begin to create good images. The first, in my view, after learning how to properly hold/stabilise the camera, is Composition. An image with good composition can be an effective image even if the exposure is marginally off.
Second is proper exposure. After Composition, Exposure, in my view, is the basis of good photography. So while an image with good Composition with Exposure being slightly off can make for a good image, if Exposure is such that everything is way over or under-exposed the image is unusable.
The third element is focus. This is in reference to both focus itself and focal point. Focus is making sure the image is not blurry and focal is directing the viewer’s eyes where you want them to go.
Let’s Address Exposure First
Exposure is a matter of balancing the three elements of the Exposure Triangle (shutter speed, aperture and ISO) . The easiest way I have found to teach this concept is to break it down by determining two of the elements and use the third to get correct exposure.
What do I mean? For example, make sure your camera is in Manual Mode, set your ISO to say 400, now determine if you want everything in focus or only items closest to the camera with items furthest from the camera blurred (this is an artistic decision). Let’s choose a relatively large aperture, say f5.6. Now select a subject, look through the view finder of the camera and read the meter, if it is to the left or right of centre the image is over or under exposed. The goal is to “zero-out” your meter, that is, place the marker in the centre of the meter scale, to do this you only need to increase or decrease the shutter speed to get the meter marking to the centre.
Once you have done this you have effectively used the Exposure Triangle to correctly expose an image.
You can use this method by “fixing” any two of the three and using the third to zero out your meter.
See how easy it actually is? After a while much of it will become second nature, you will make decisions before you ever put the camera to your eye. Typically, if you are shooting during the day there will be little need to change your ISO unless lighting conditions are changing rapidly, unlikely to happen. So you can “fix” your ISO. You then decide on your depth of focus, Aperture, you fix that, the only thing left is shutter speed and you use that to correct your exposure.
You may decide to “fix” the shutter speed, you may want to create blur in your image, you will set a slow shutter speed, you can again leave your ISO at 400 and set your exposure using your Aperture.
So you see, this proper exposure thing is easy, once you have a basic understanding…….anyone can do it.
Remember that photography is nothing more than the capture of light, the light falling on or the light being reflected from your subject. All you need to do is properly expose for that light.
Since, I stated that I believe that Composition is more important, overall than exposure, I say that because automatic settings in cameras do a pretty good of setting the right exposure and I believe one should learn Composition first.
Composition is nothing more than attracting and keeping the attention of the viewer, at least long enough to truly experience what you have captured.
Without going into too much detail, couple of key Compositional Elements, are:
Rule of Thirds - think of thirds as splitting your view finder into three equal rows and three equal columns……..simply, in your initial learning, never place you subject in the smack dab middle of the frame, that makes for a boring and predictable image, on most occasions. Place the subject in the left third or the right third of the screen. This creates negative space and gives the eye somewhere to go.
When shooting a landscape image where there is the presence of the horizon, never place the horizon in the middle of the frame, again this typically creates a boring and mundane image, place the horizon in the upper of lower third of the frame. This again gives the eye somewhere to wonder across and through the image. If you are shooting a Sunset, put the horizon in the lower third because you want the viewer to focus more on the beauty of the Sunset. If you are shooting a beach scene, for example, your goal is likely to show the beauty of the beach so you would place the horizon higher in the blue sky to have the viewer focus more attention on the beach and its details.
Lead In Lines - this is taking elements that are essentially straight lines, placing them in the frame as if they are pointing the viewer into the scene of toward your ultimate subject, an example would be, there is a line of rocks in the sea that lead to a sailboat in the distance. You would frame the image so that the line do indeed point directly at the sail boat. These line lead the viewer’s eyes into the scene.
I trust this has been of some assistance.
![exposure-triangle[1].jpg](https://images.squarespace-cdn.com/content/v1/5c59ec5177b9031514b49b72/1553464700365-9OYOTWV2HYEYH1KPWAMK/exposure-triangle%5B1%5D.jpg)
Why I went back to shooting film
If you read my first blog post you will know that I started my time in photography nearly 40 years by shooting and developing B&W film.
Today I have gone full circle and have gone back to shooting and developing film.
Perhaps you are asking why I would want to go back to shooting film with the advancement of digital. It is not because I am some film snob thinking I am a better photographer than one who has never shot film. The answer is because I truly enjoy the process. When shooting film one must be deliberate in order to capture a good and usable image. This means that I am very deliberate in framing/composing of the shot, metering across the scene, with a focus on the shadows and where within the Zone, yes, I use the Zone System, I want the shadows. I set my exposure, check the composition again and only after all these steps do I press the shutter to capture the image.
NB// I am referring specifically to shooting B&W film. The process to shooting colour is a little different.
I tend to shoot only one image of a scene as my goal is to make every shot count. I am using a Pentax 6x7 Medium Format camera, which means I only get 10 images per roll of 120 film. My goal is also not to have to sort through a whole slew of images to pick the best one.
With digital we tend to shoot a large number of shots while out shooting, which means that every shot does not need to count. I too am guilty of this at times and then I end up with hundreds of images to sort through to determine the best one(s) of very similar images.
Film has simply caused me to really slow my process down and to truly see the image before I take it, if I look through the view finder and the image really does not enthuse me I will not take the shot, with digital I would likely take the shot an edit it later.
I will readily admit that shooting film is also nostalgic and I again get excited about pulling the developed negatives out of the development tank and hanging them to dry and having that anticipation of the quality of images I have captured.
The reality is that I am not using a full analogue process as Ii am scanning the negatives instead of printing is a dark room, I would image that to be true of most who have gone back to shooting film or have forayed into shooting film. So the process is really a hybrid between analogue and digital. Doing some dark room printing is, however, on my agenda.
The other thing I really like about film is that in order to capture a properly exposed imaged one must fully understand and be able to apply the Exposure Triangle. With film your ISO is preset by the film speed or the ISO you use to push or pull the film (will post about pushing and pulling film at a later date), therefore, the variables are Shutter Speed and Aperture. Under the Exposure Triangle is of paramount importance in film because unlike digital you cannot review the image on a screen at the back of the camera and then make adjustments. Film also loves light and has a high propensity to retain highlight detail, thus why we expose for the shadows and not the highlights. The worst thing you can do with film is under-expose it.
Just quickly, as I mentioned, I use the Zone System for metering film, principally B&W film. What is the Zone System?
”The Zone System assigns numbers from 0 through 10 to different brightness values, with 0 representing black, 5 middle gray, and 10 pure white; these values are known as zones. To make zones easily distinguishable from other quantities, Adams and Archer used Roman rather than Arabic numerals.”
Source: https://en.wikipedia.org/wiki/Zone_System
My process, I meter off the darkest spot in the image and determine where I want that to fall on the 0-10 scale. I typically like my shadows to be darker instead of mid-gray, which is where the meter places them. So if my meter tells me that the Exposure Value for the shadow is 8 for Zone 5 I will likely place the shadows in Zone 3. This will give me shadows with some detail. All of this is dependent on the overall scene and the difference in Exposure Value between the shadows and the highlights. Ultimately though, it is an artistic decision based on your own preferences.
I will write addition posts about my film photography work.
Thank you again for taking the time to read.

My First Ever Blog Post
I know this is long overdue and it is something I had planned to start quite some time ago……….as with many things, other things come up to distract one’s attention.
Who Am I?
I am Guilden Gilbert, a photographer born and raised in Bermuda and I have been living in the Bahamas since 1997.
Photography has always appealed to me, I say always because while I truly delved into this art form back in 1980 or 81 as a 14 or 15 year old my Mom tells me that I was always fascinated with cameras and with taking pictures.
My first “real” foray into photography came about while I was participating in the Duke of Edinburgh Awards in high school in Bermuda. We were asked to select a hobby, I chose photography where we shot, developed and wet printed B&W film images . It was this experience that set me on the path to this journey into photography where, nearly 40 years later I am just as passionate about it.
My very first “real” camera was a Canon AE-1 and ran so, so many rolls of film through that camera. I got this camera just after completing the hobby series during the Awards and I used it until it was stolen in 1999. When I first started out I would shoot between 8 and 10 rolls of film a week and my parents covered the cost of the film development.
I taught myself photography because back then many professional photographers were not prepared to take the time to teach someone the art form. I learned through trial and error, thus the large number of rolls of film each week. Without knowing it at the time my trial and error taught me the Exposure Triangle. I would make notes of my settlngs for each frame so that when I received the prints back I would know the setting for each image and I learned what worked and didn’t work under various lighting conditions. I also experimented with various ASA (ISO) film stocks and learned how to rewind a partially exposed roll so that I could change the ISO and then go back and finish the incomplete roll.
After my AE-1 was stolen I took a break from photography because I saw the technology changing rapidly. When I did jump back into photography I realised my mindset with shooting had to change slightly. With film I learned to expose for the shadows but with digital I had to adjust and expose for the highlights to avoid blowing out pixels making them un-retrievable.
I consider myself fortunate to have been born in the most beautiful place on Earth, Bermuda and today residing in the second most beautiful place on Earth, the Bahamas……..:-).
As you will see from my images my work consists of a number of genres, Landscapes (Seascapes), some Portraits and quite a bit of Sports.
I have been under contract with the Bermuda Football Association to shoot a World Cup Qualifier between Bermuda and the Bahamas. I have been under contract to shoot the IAAF World Relays, the CARIFTA Games, FIFA Beach Soccer World Cup Qualifiers. I have been honoured to have been featured as a Sports Photographer in N Photo Magazine, had a number of my images selected for exhibitions by BlankWall Gallery in Athens, Greece, I have received Honourable Mention in some very large global photo contests and I am proud to have my work hanging in homes and offices in many places around the Globe.
In the past few years I have taken the step to teach photography so that I can pass on the wealth of knowledge I have gained in this art form. I happy to see some of my former students truly beginning to excel in this craft.
So that is me in a nutshell. Hopefully I can be consistent in writing new posts. i welcome feedback.

This is me………